

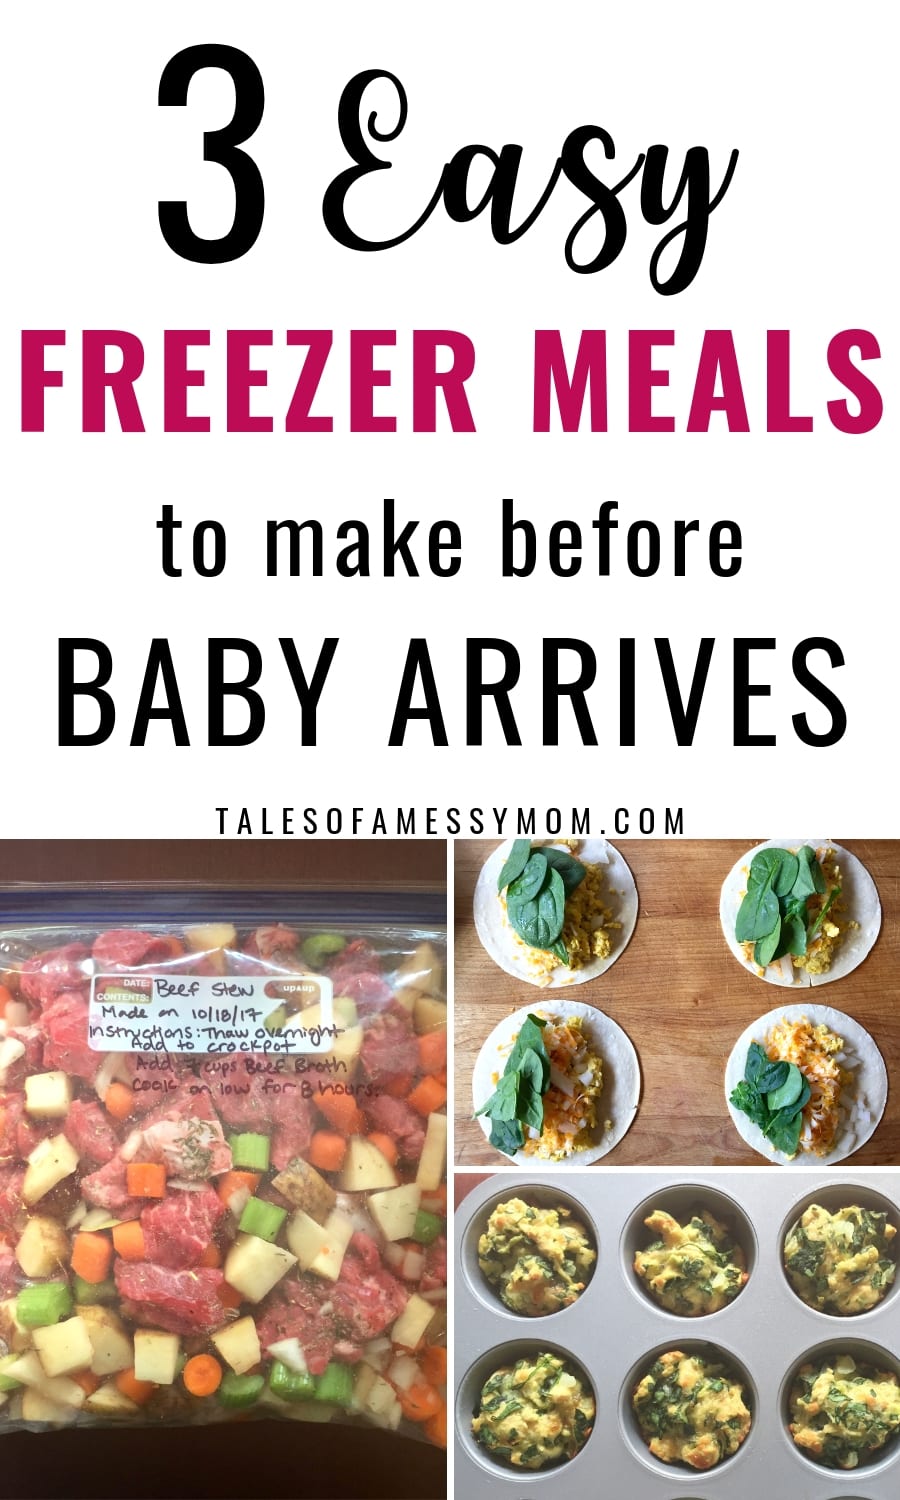
3 Easy Freezer Meals to Make Before Baby is Here
Are you wanting to alleviate as much stress as possible after your new baby is here? Looking for some simple, nutritious recipes that will keep you from spending hours in the kitchen?
Freezer meals will help save your sanity when you’re sleep deprived, knee deep in dirty diapers, and have a newborn baby attached to you. Having easy to grab meals in your freezer will allow you to focus more on your baby and prevent you from ordering out every night.
Listed below are 3 easy freezer meals to make before your baby is here, covering breakfast, lunch, and dinner.
The trick will be to keep your hubby (and yourself) from eating all the food before baby is here. 😉
**Just so you know, Tales of a Messy Mom may collect a share of sales from purchases made through the affiliate links on this page. See the full disclosure here.
Freezing Tips & Tricks
- Start with a grocery list: Choose which recipes you want to use and make a grocery list based on those, so you can get everything in one trip.
- Don’t forget your supplies: You’ll also need aluminum foil, gallon-size freezer bags, and a permanent marker for storing.
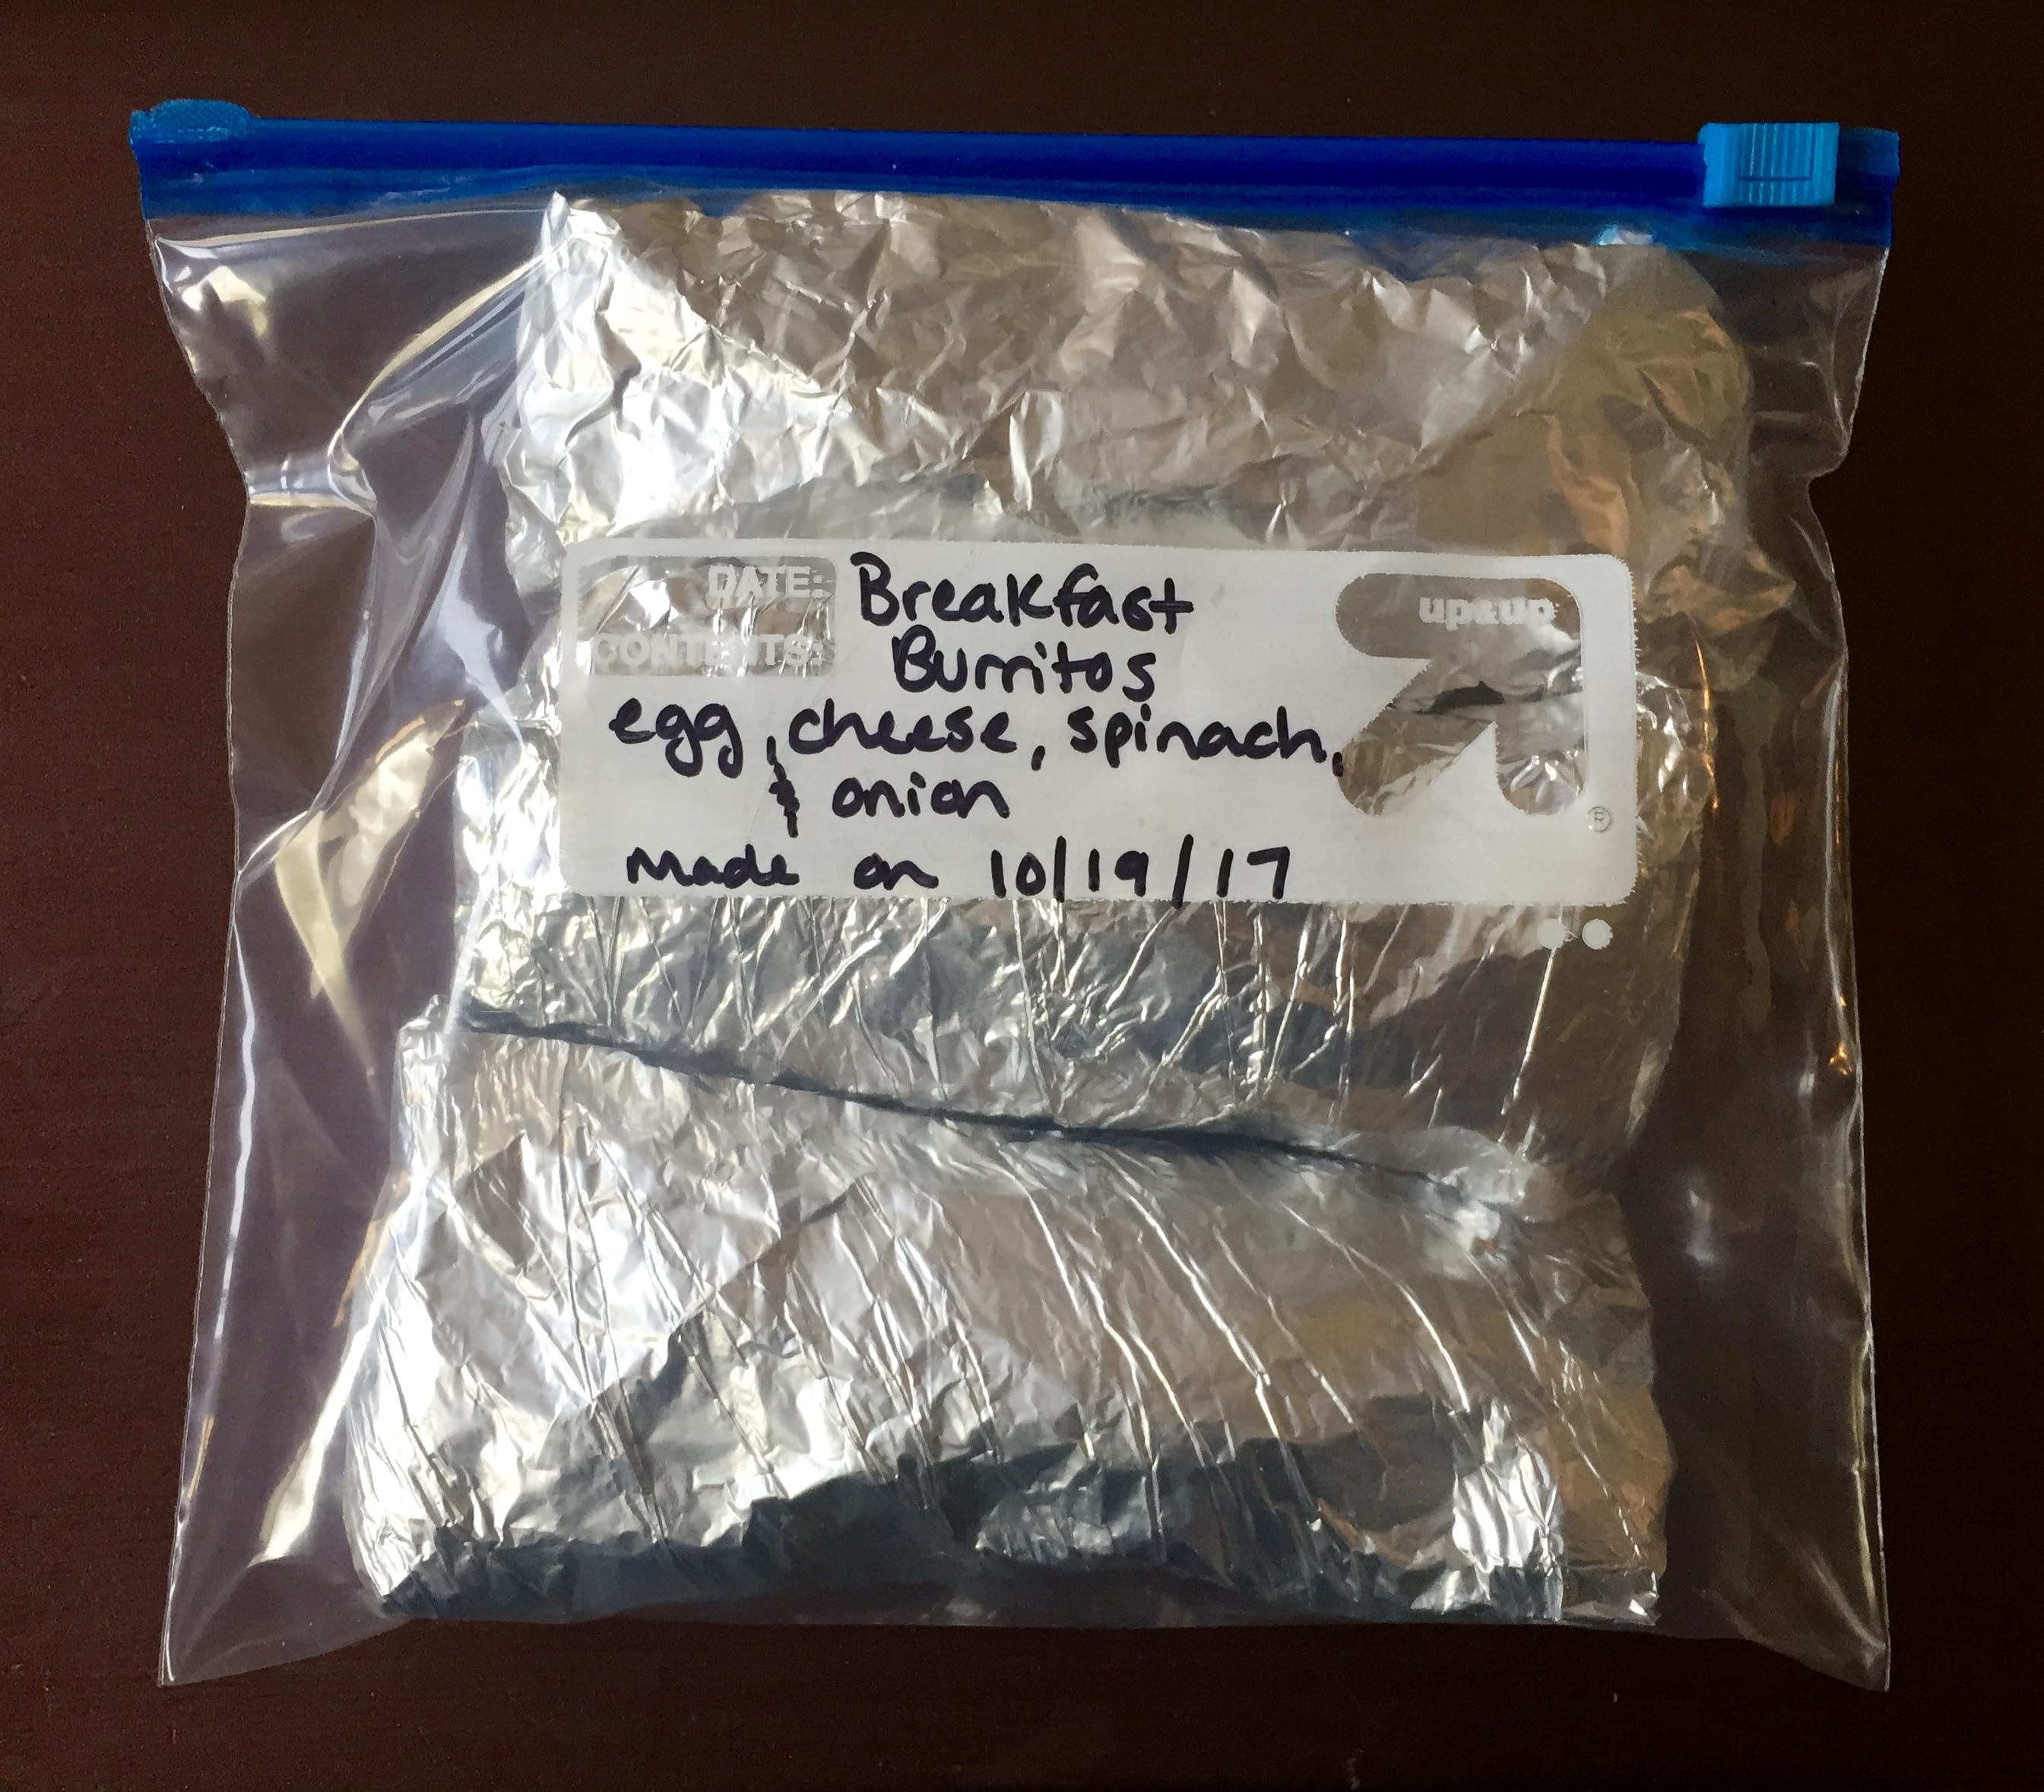
- Label your bags: To avoid mystery foods and foods of unknown ages, be sure to write the name of the recipe, the date it was made, the date it is good until, and directions for cooking on your freezer bags before filling them.
- Squeeze out the air: Removing as much air as possible before sealing and freezing will help maintain freshness and maximize your freezer space.
- Freeze leftovers: If you have leftover ingredients, like onions and peppers, cut them up and freeze them in 1 cup increments, so you can easily grab them for future recipes.
3 Easy Freezer Meals
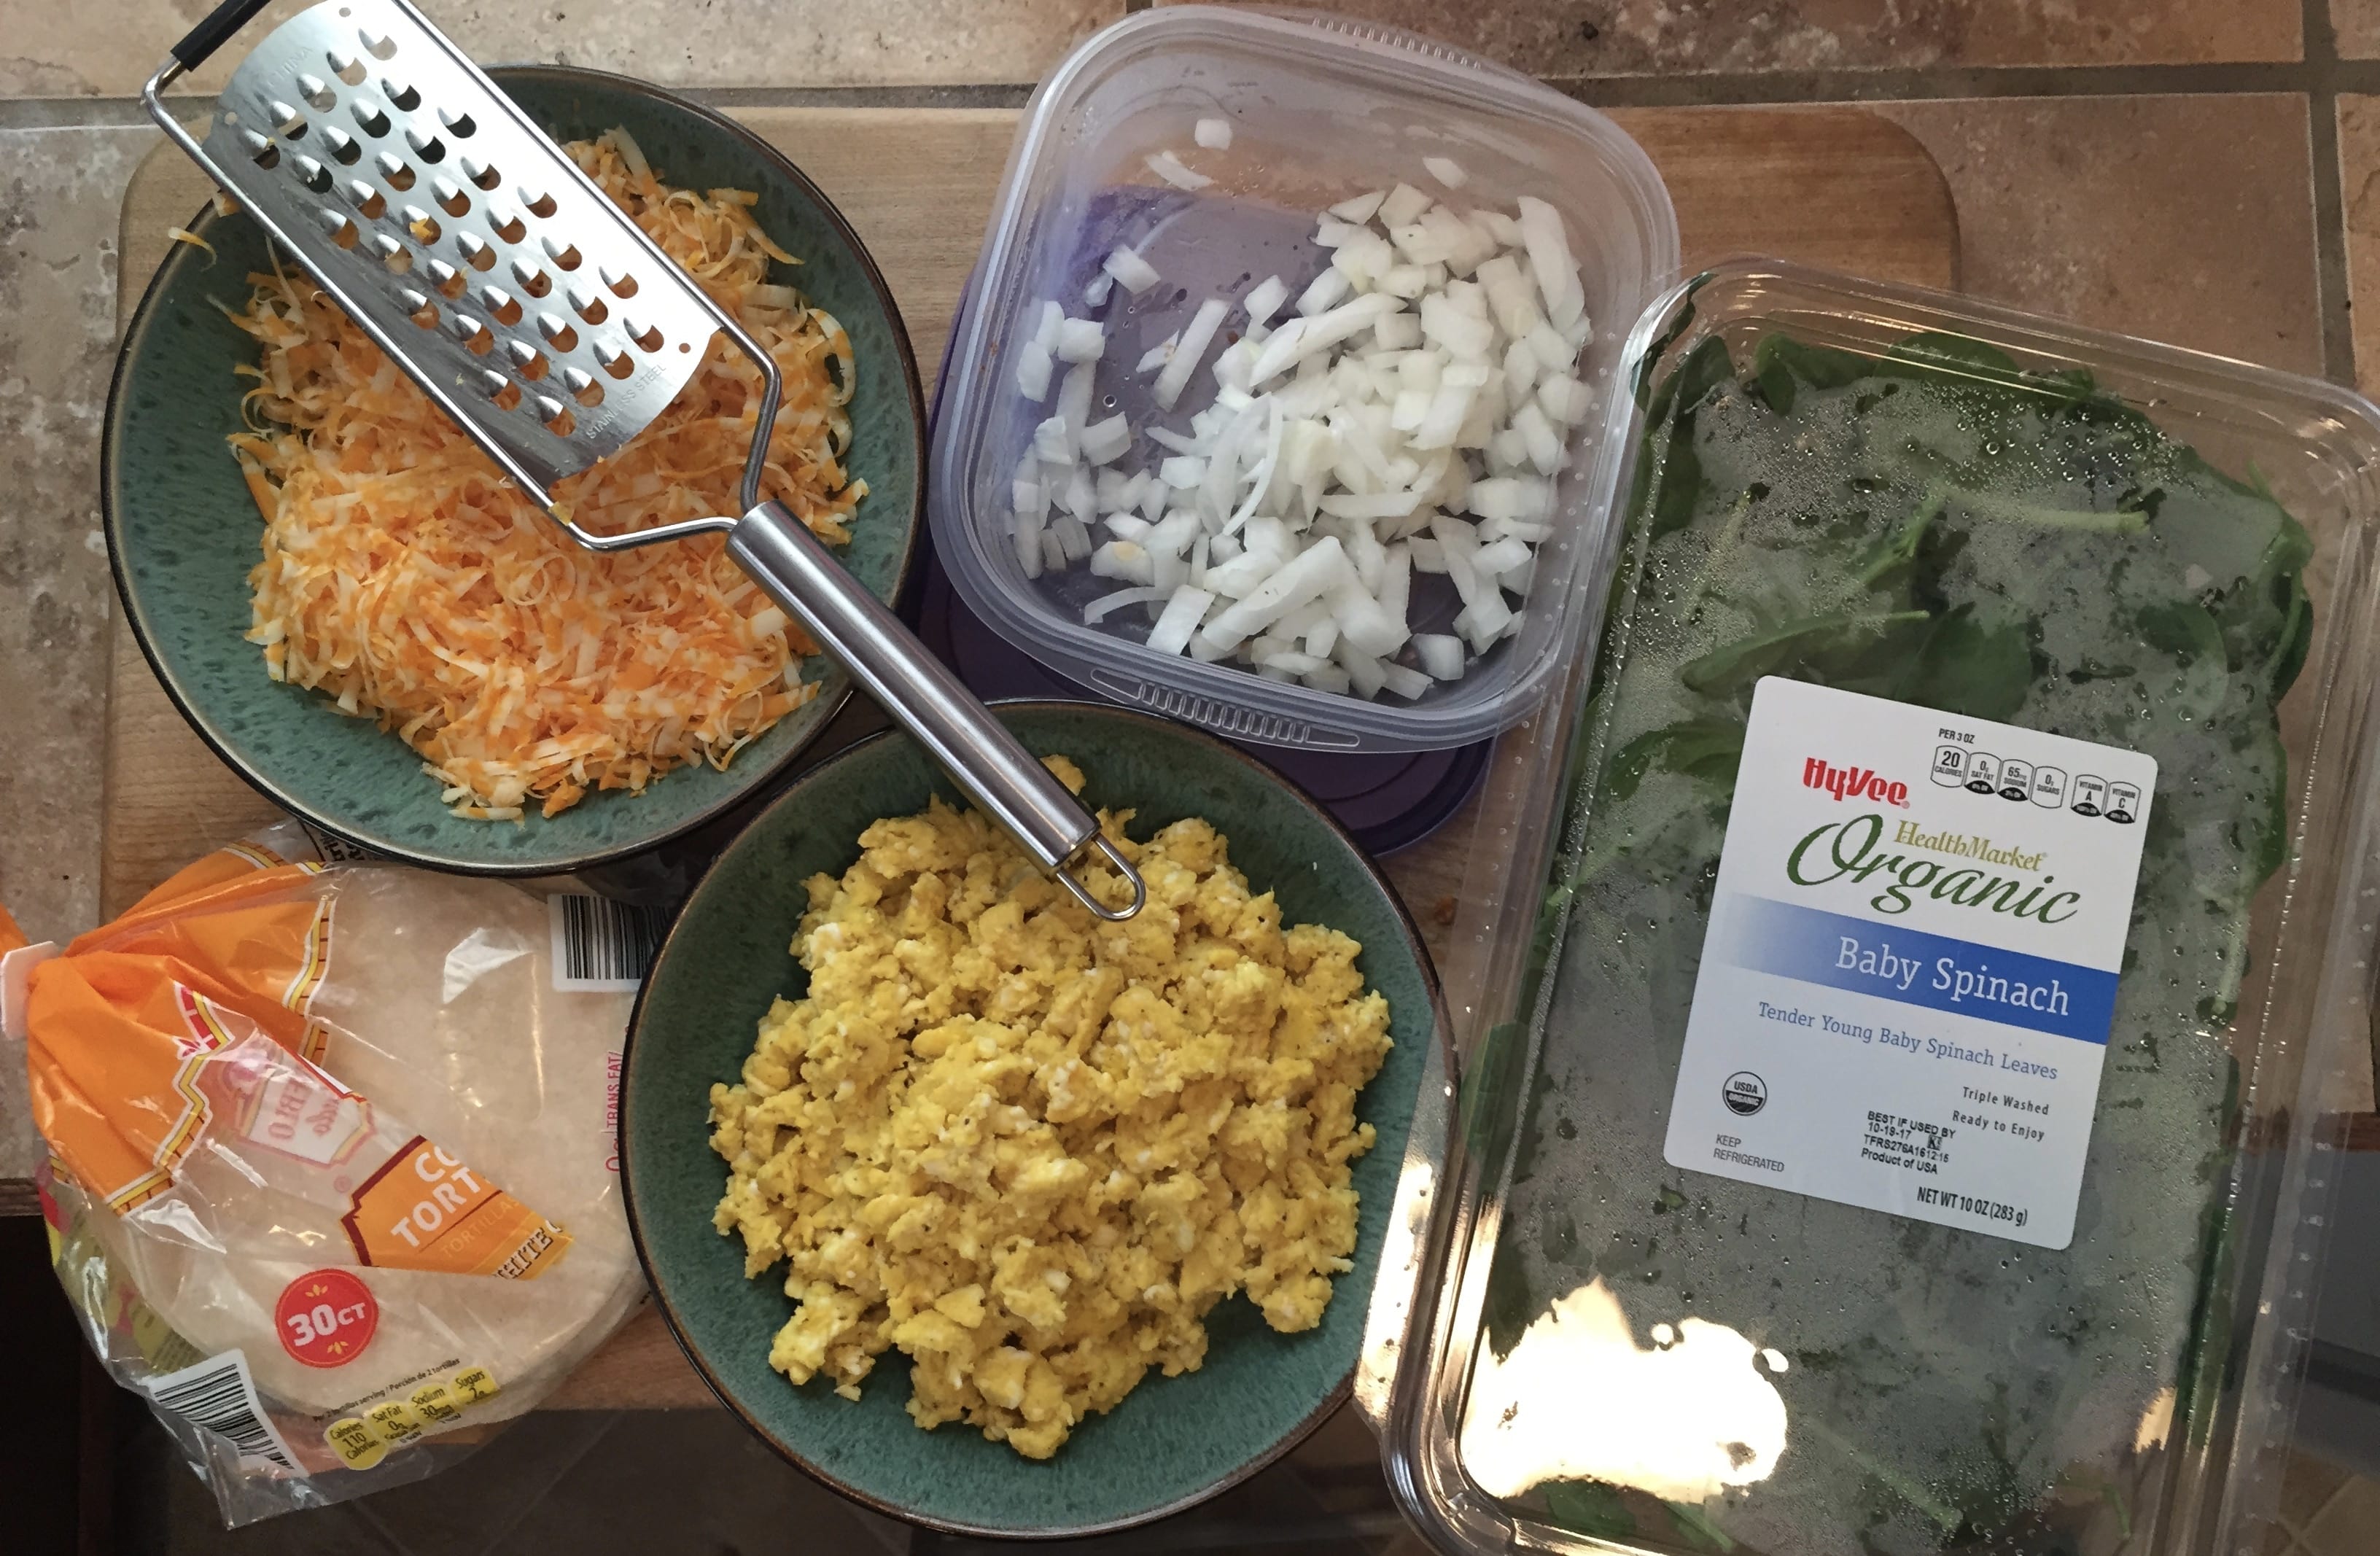
1. Breakfast Burritos
Ingredients:
Eggs (scrambled)
Tortillas (corn or flour): Large flour tortillas work best to prevent them from cracking and falling apart, but if you’re gluten free, stick with corn tortillas.
Your choice of veggies (spinach, mushrooms, onions, green peppers)
Shredded cheese
Optional Extras: Cooked Yukon gold potatoes, cooked sausage, cooked bacon
Directions:
1. Cook your eggs: In a small bowl, whisk your eggs with some milk and salt and pepper. Melt 1 tbsp. of olive oil or butter in a pan over medium heat. Add the eggs and cook, stirring occasionally, until mostly set but still moist, then remove from heat.
2. Sauté your vegetables: After you dice up vegetables of your choosing, set them aside and melt a tbsp. of butter over medium-high heat in a skillet. Add the veggies to the hot butter and cook until they are tender and starting to turn golden brown, approximately 8-10 minutes, stirring occasionally.
3. Assemble your burritos: Let your eggs and vegetables cool while you set up an assembly station. (Assembly works best when your eggs and veggies are at room temperature.) Place a tortilla on top of a piece of aluminum foil. Sprinkle some shredded cheese onto the tortilla. Top the cheese with scrambled eggs, sautéed veggies, and any extra toppings.
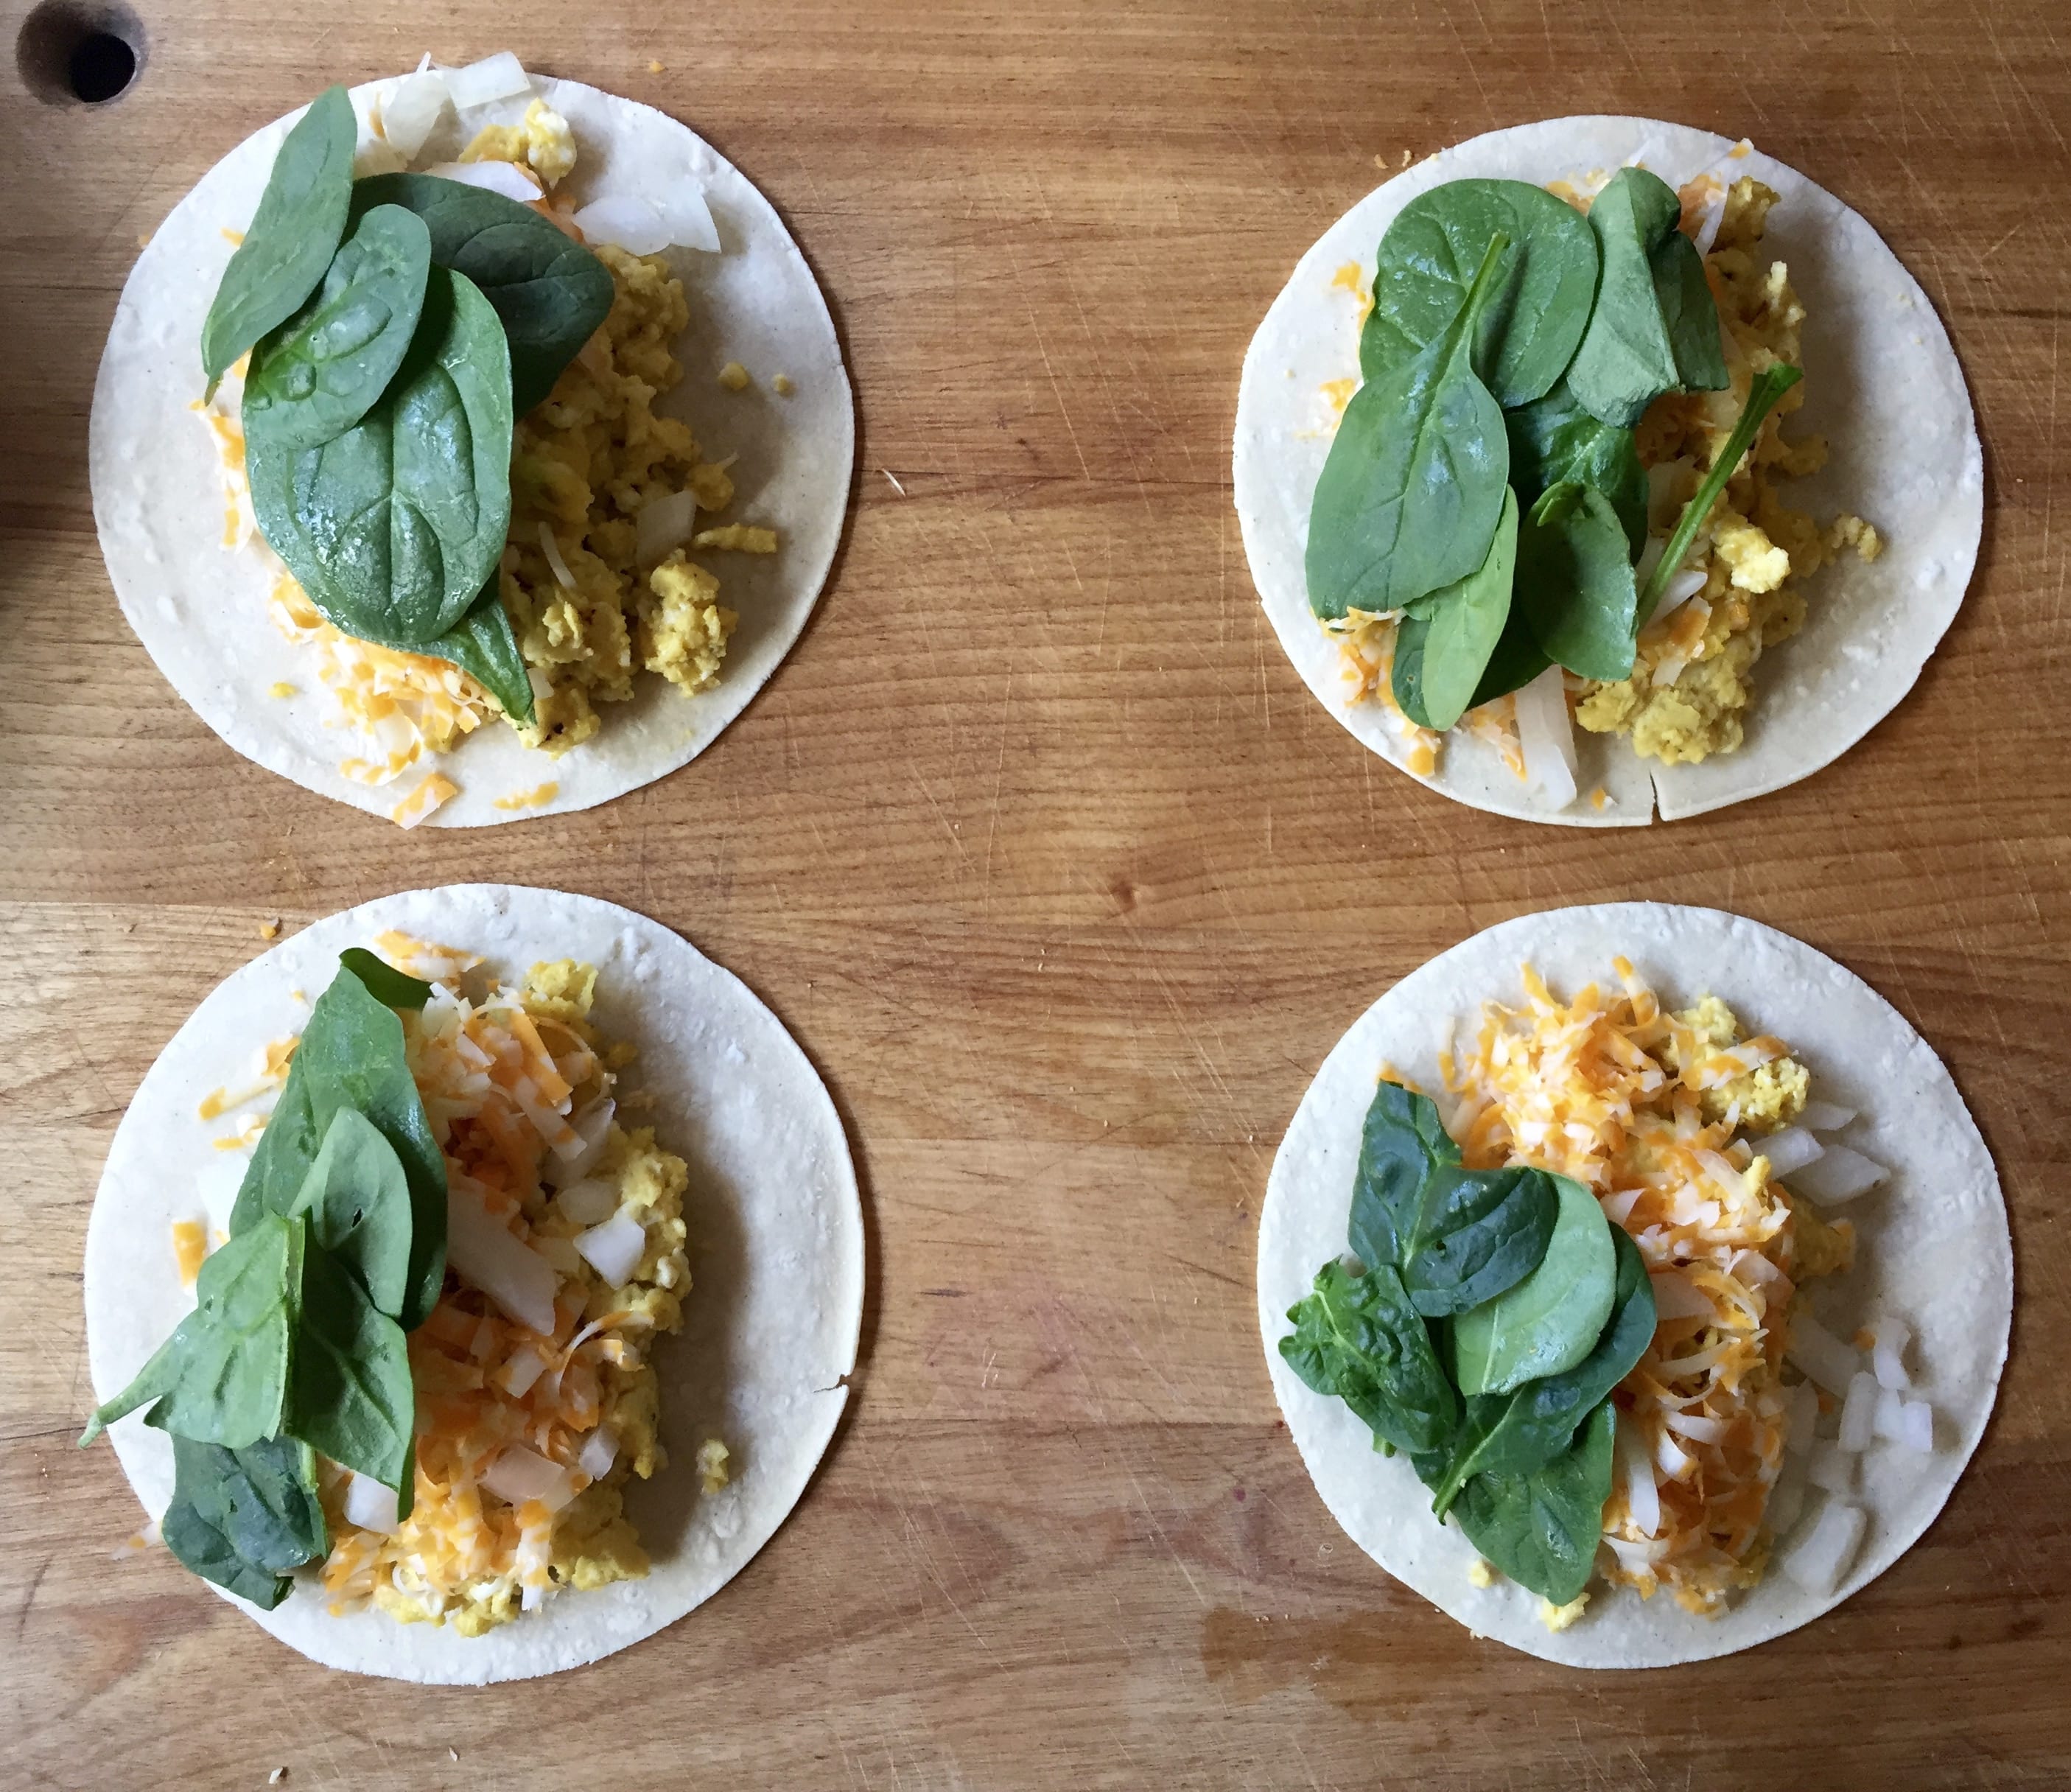
4. Fold the burritos: Roll the burrito tightly, by folding the sides in first, then rolling from the bottom up.
5. Wrap and freeze: Wrap the burrito with aluminum foil. Repeat filling, folding, and wrapping with each burrito. Store frozen burritos in a gallon-size freezer bag for long term storage.
6. To eat: Unwrap and heat in a regular or toaster oven at 350°F for 12 to 15 minutes. Enjoy!
Storage: Can be stored in the freezer for up to 3 months.
Shop related products.
 | Airtight Reusable Ziplock Bags BPA Free - Microwave, Freezer and Dishwasher Safe | Food Grade Zip Top Containers") Reusable Silicone Food Stor...Shop on Amazon
Reusable Silicone Food Stor...Shop on Amazon Slow Cooker With Temperature Probe, 6 Quart, Programmable, Stainless Steel") Hamilton Beach (33967A) Slo...Shop on Amazon
Hamilton Beach (33967A) Slo...Shop on Amazon Seriously Good Freezer Meal...Shop on Amazon
 15oz") Mommy Knows Best Lactation ...Shop on Amazon
Mommy Knows Best Lactation ...Shop on Amazon
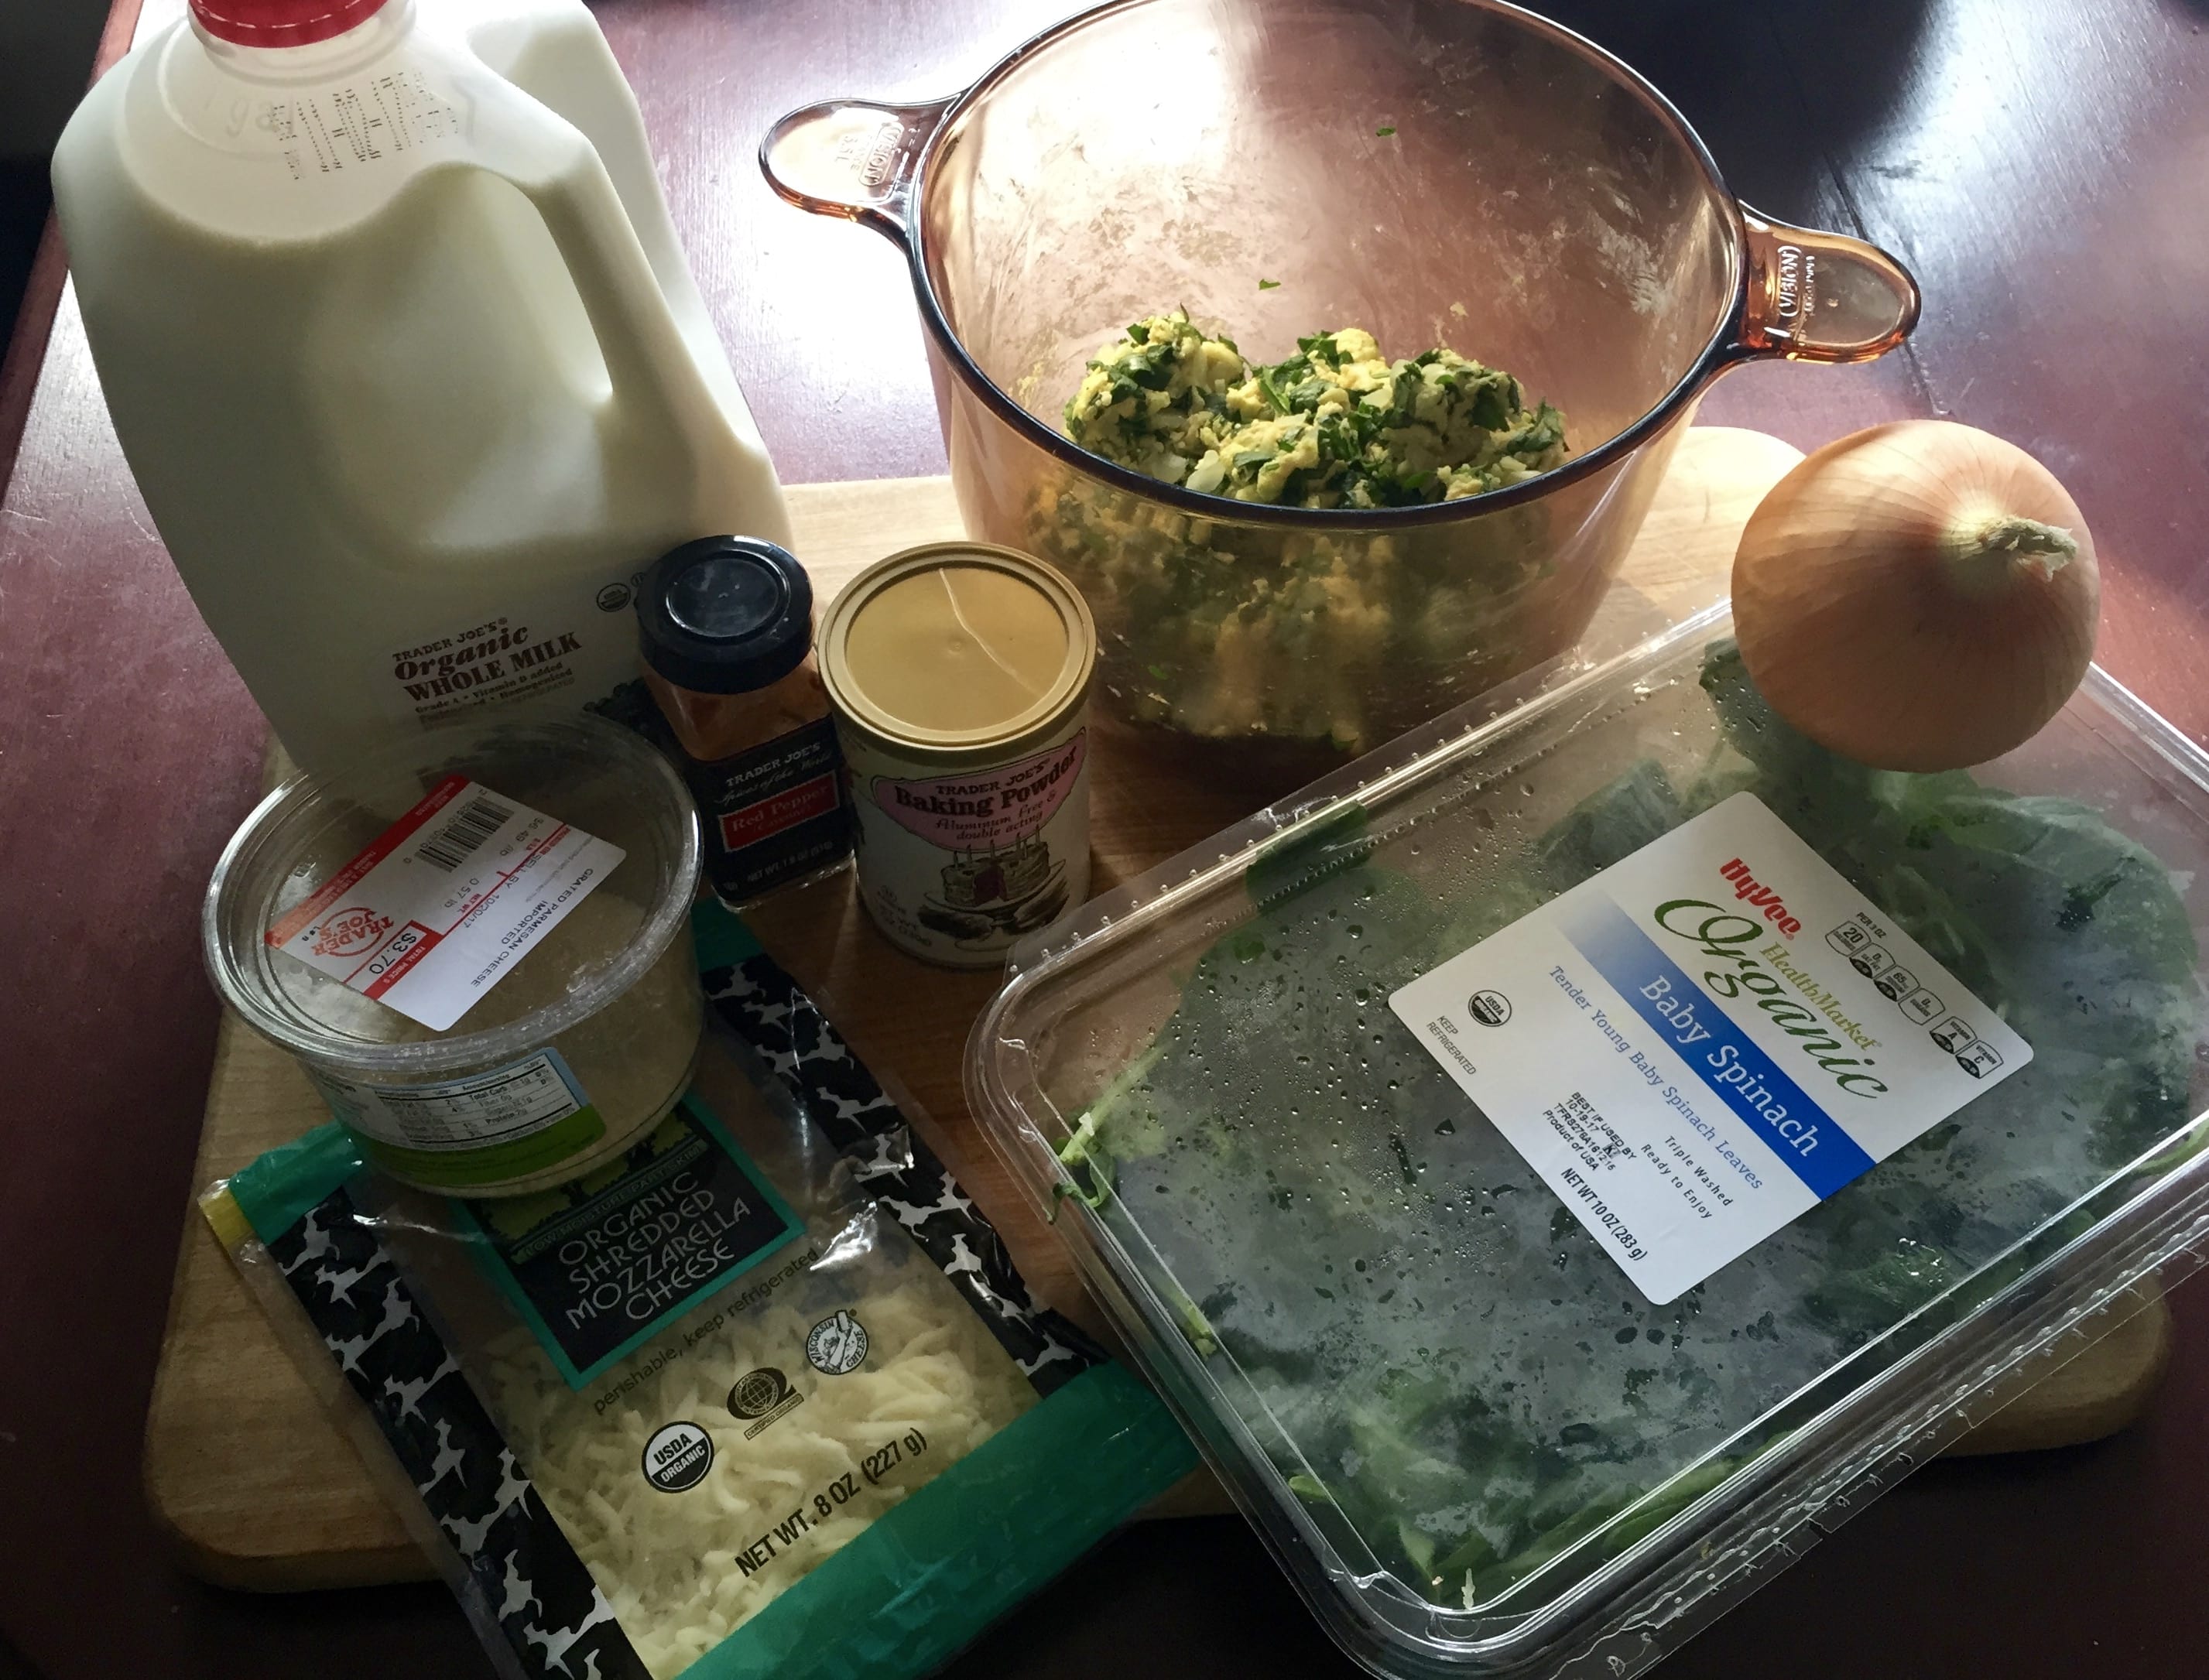
2. Spinach and Cheese Muffins
These make a great hearty snack or a light lunch. They’re perfect for when you’re home alone with baby because you can eat them with one hand. Plus, you’ll be getting iron and vitamin K and A from the spinach.
Ingredients:
1 cup plus 3 tbsp. all-purpose flour
1 1/2 tsp. baking powder
1/4 tsp. cayenne pepper
1/2 yellow onion (diced)
1 egg
1/2 cup milk
2/3 cup grated parmesan cheese
1/4 cup shredded mozzarella cheese
2 cups baby spinach leaves (torn)
1 tbsp. unsalted butter or olive oil
Directions:
1. Preheat your oven: Preheat your oven to 325 degrees Fahrenheit and line a muffin tin with oil (or use cooking spray).
2. Fry the onion: Heat your butter or oil in a frying pan. Add in your diced onion, and cook until soft, stirring occasionally. Transfer onion to a bowl and set aside.
3. Combine dry ingredients: Mix together flour, baking powder, and cayenne pepper into a large bowl, and then create a well in the center.
4. Mix the wet ingredients: Whisk your egg and milk in a liquid measuring cup and then pour into the flour mixture and fold together.
5. Complete the mixture: Add the parmesan cheese, mozzarella cheese, fried onion, and spinach into the mixture and continue folding until it is mixed evenly.
6. Fill the muffin tin: Add your mixture to into the muffin tin, filling each about 3/4 of the way full.
7. Bake: Bake at 325 degrees for 17-20 minutes or until golden brown.
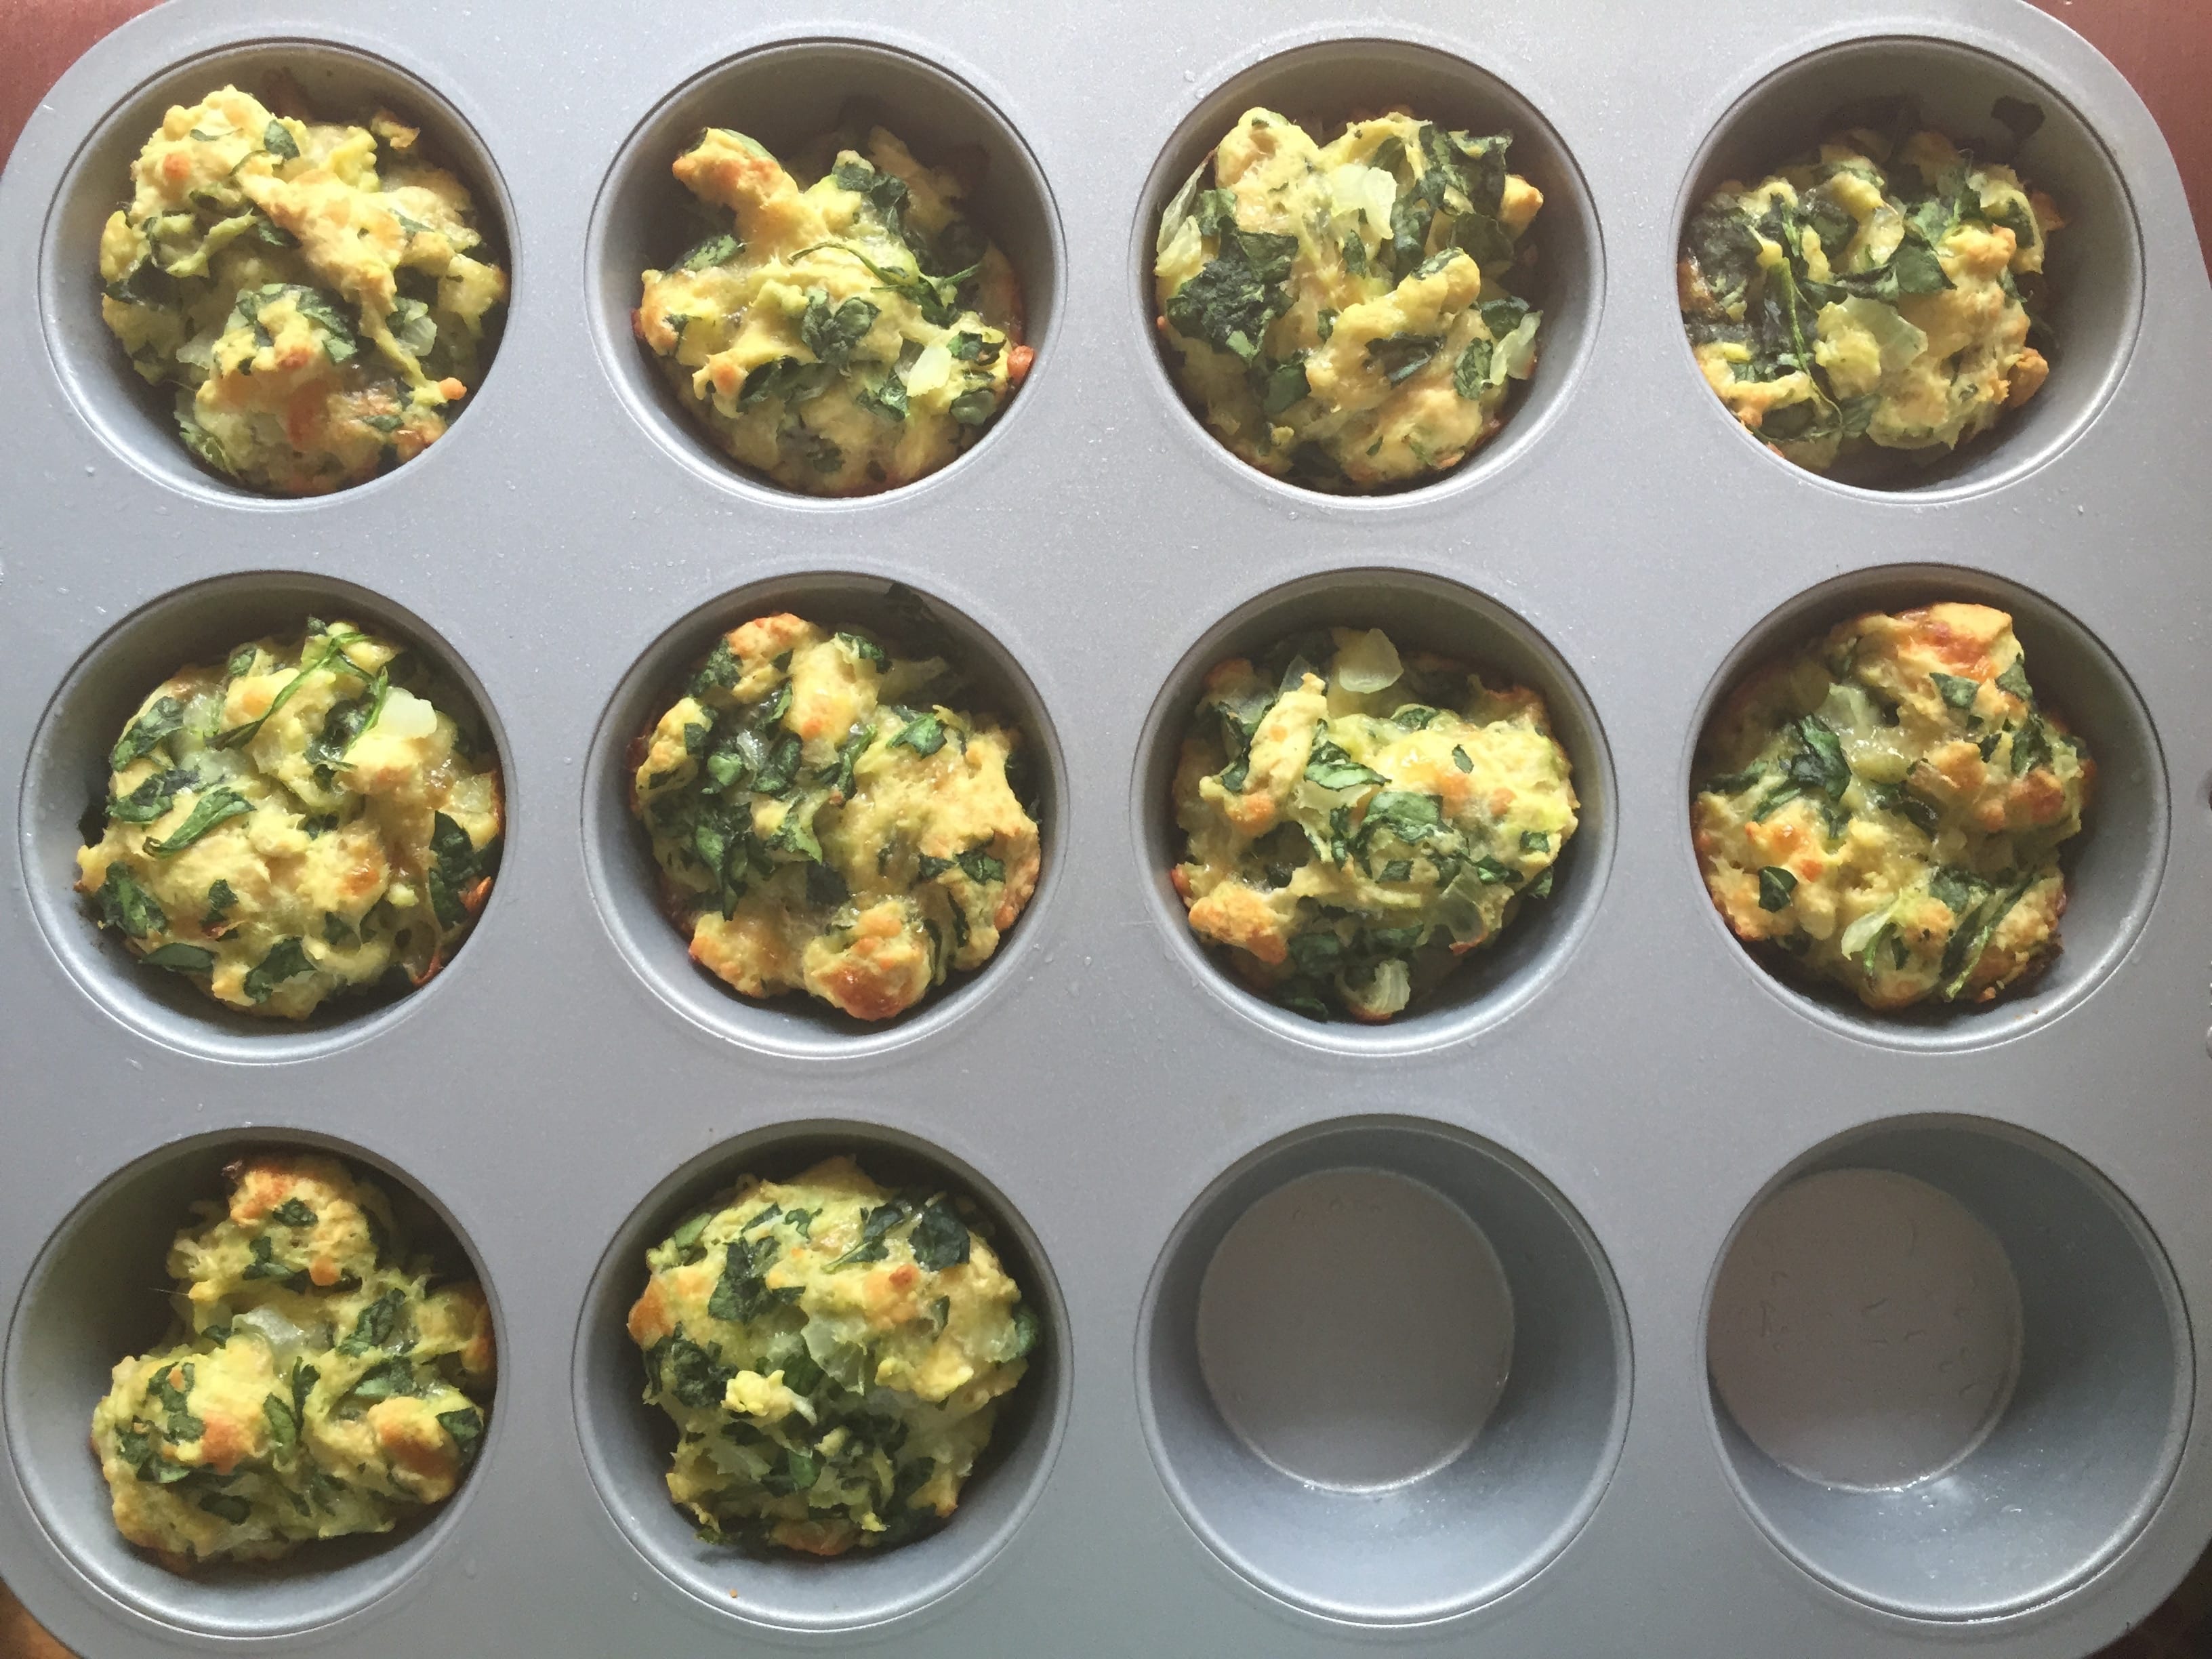
8. Let cool: Let your muffins cool for about 5 minutes before removing from tray.
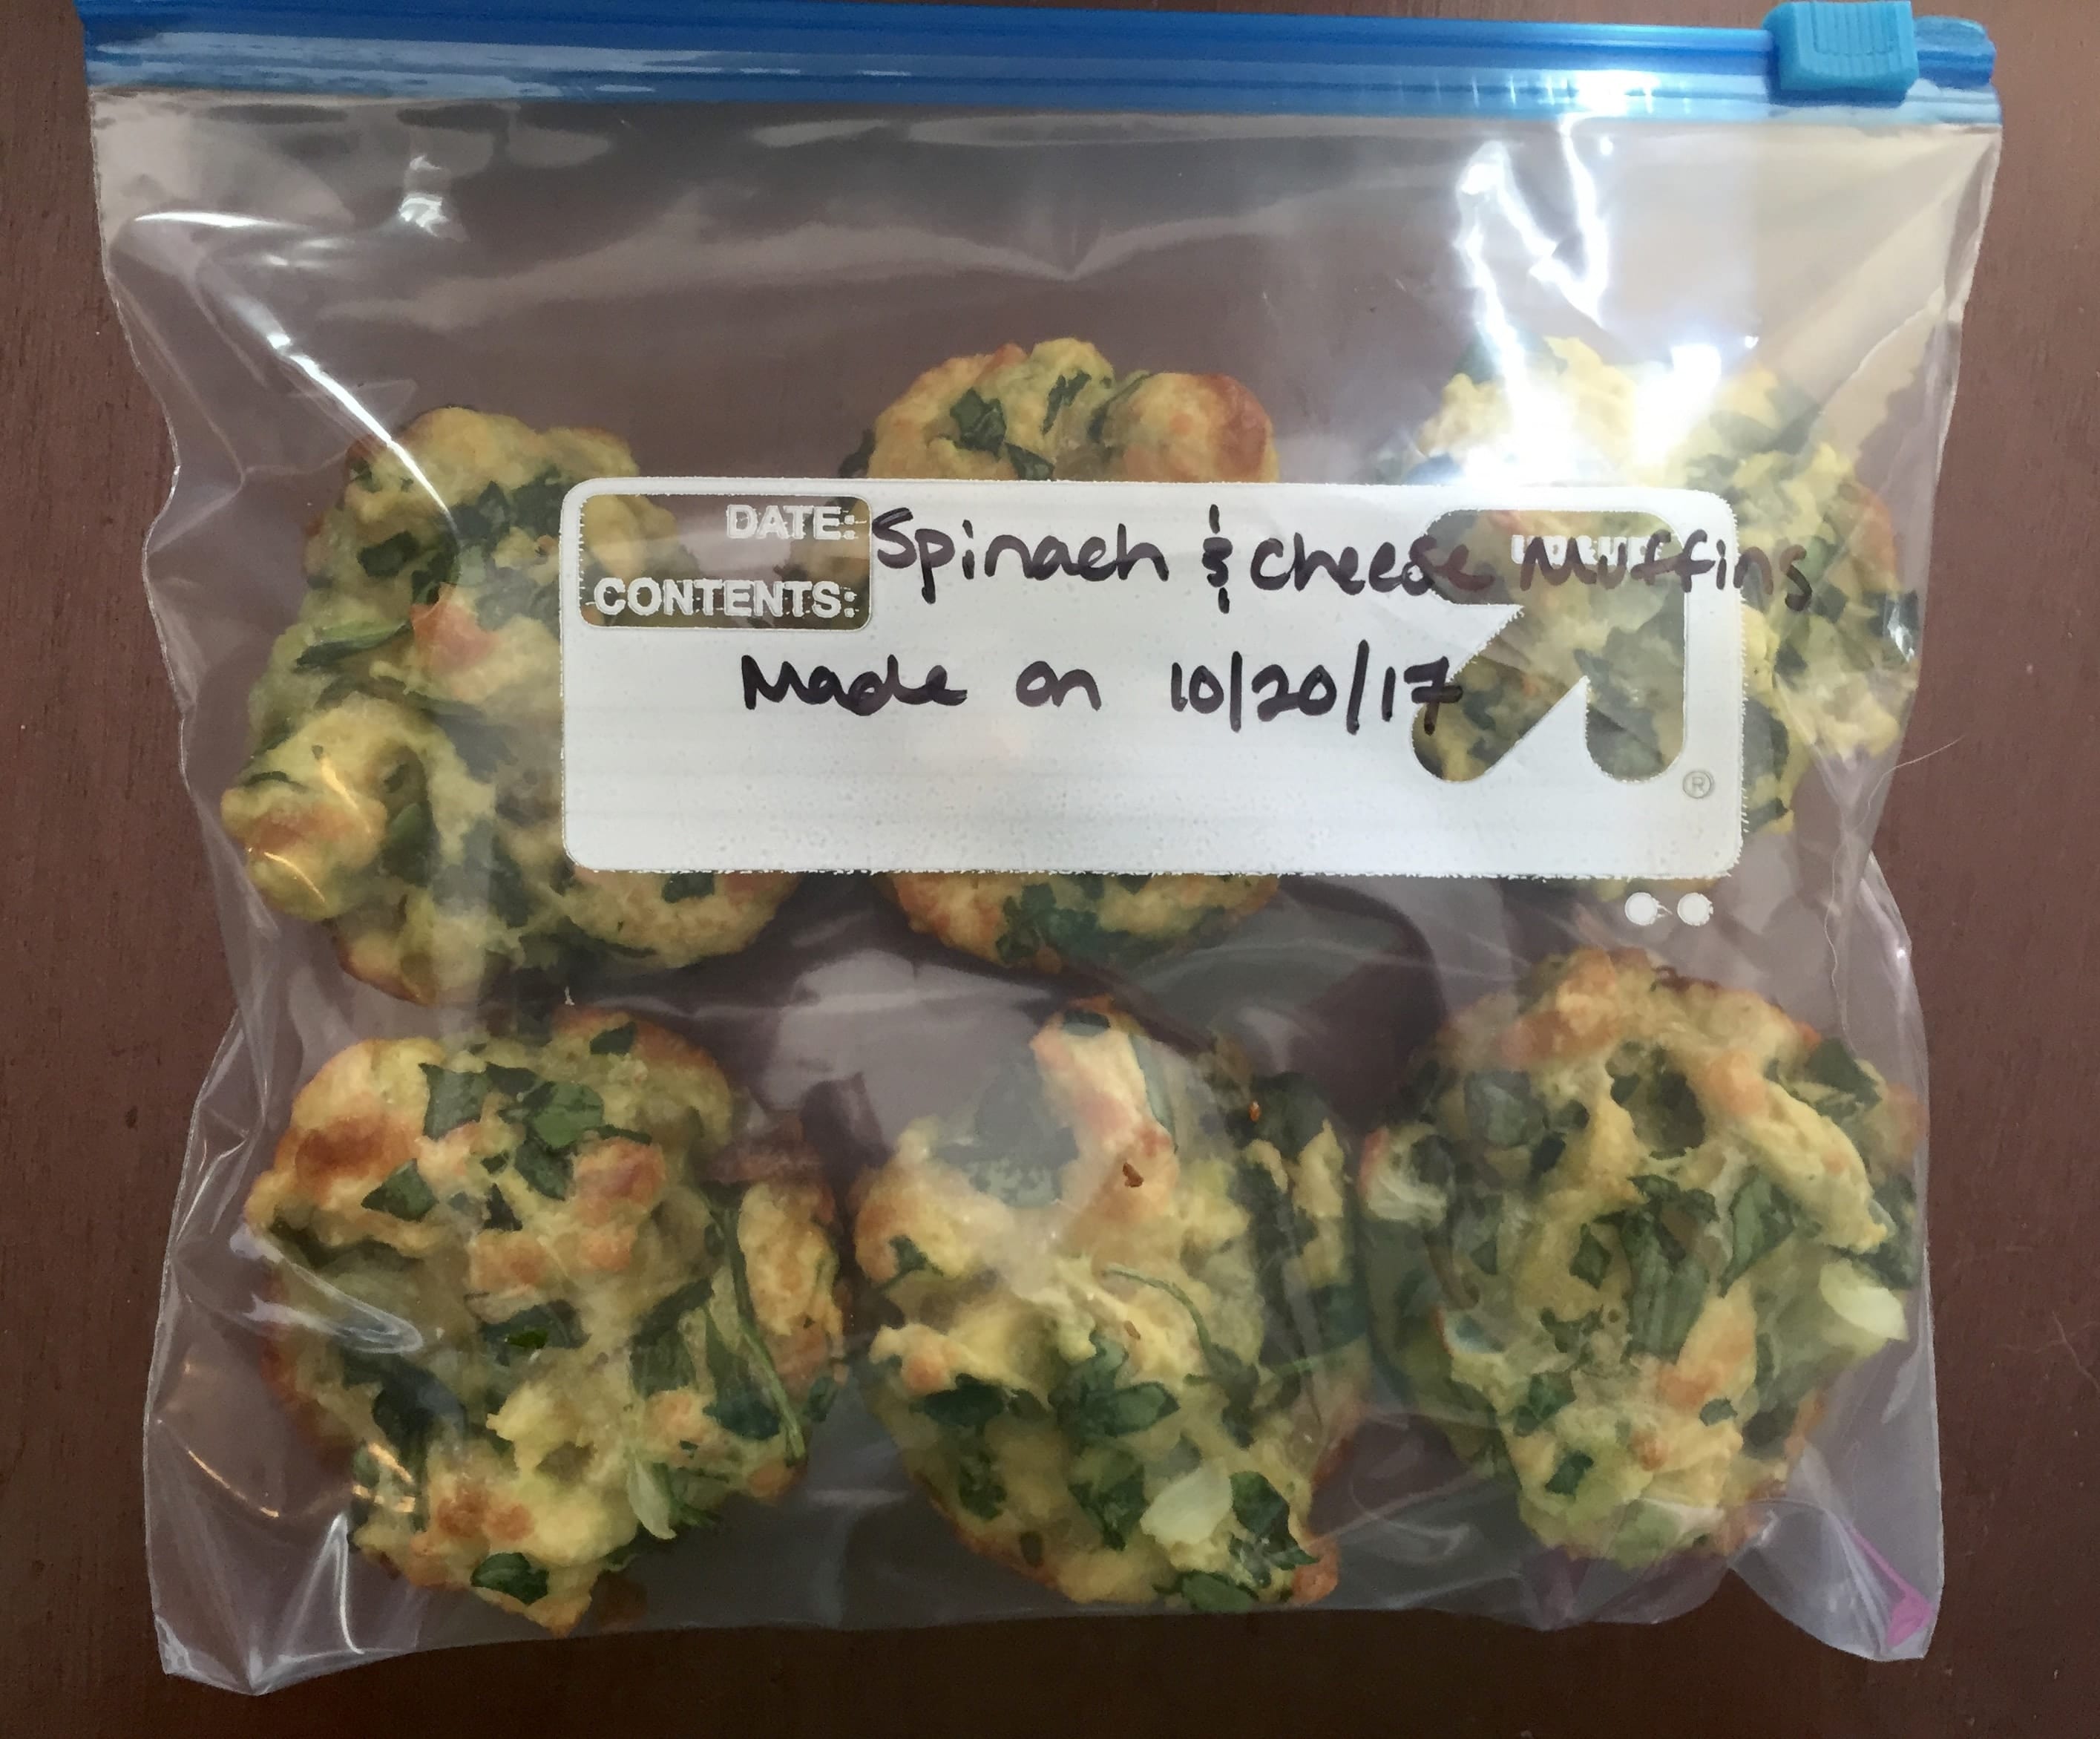
9. Freeze: Place your muffins in a gallon-size freezer bag for long term storage.
10. To eat: Heat up in the oven or toaster oven at 325 degrees for 15-20 minutes or until fully cooked in the middle. For best results, cut your muffin in half half-way through cooking. Enjoy!
Storage: Can be stored in the freezer for up to 3 months.
3. Hearty Beef Stew
Great on cold fall and winter days. Healthy comfort food that’s filling and flavorful!
Ingredients:
2 lbs. beef stew meat, cut into 1 inch. cubes
3 Gold Yukon potatoes, diced (small red potatoes also work well)
3 carrots, sliced
1 small-medium onion, chopped
2 celery stalks, chopped
2 tsp. dried thyme
1 tsp. dried rosemary
1 bay leaf
1/2 tsp. salt
1/2 tsp. pepper
7 cups beef broth
*Pro-tip: For best results, blanch potatoes before freezing. Here’s a good tutorial on how to do it.
Directions:
1. Chop chop: Chop up all of your vegetables, potatoes, and beef (if needed).
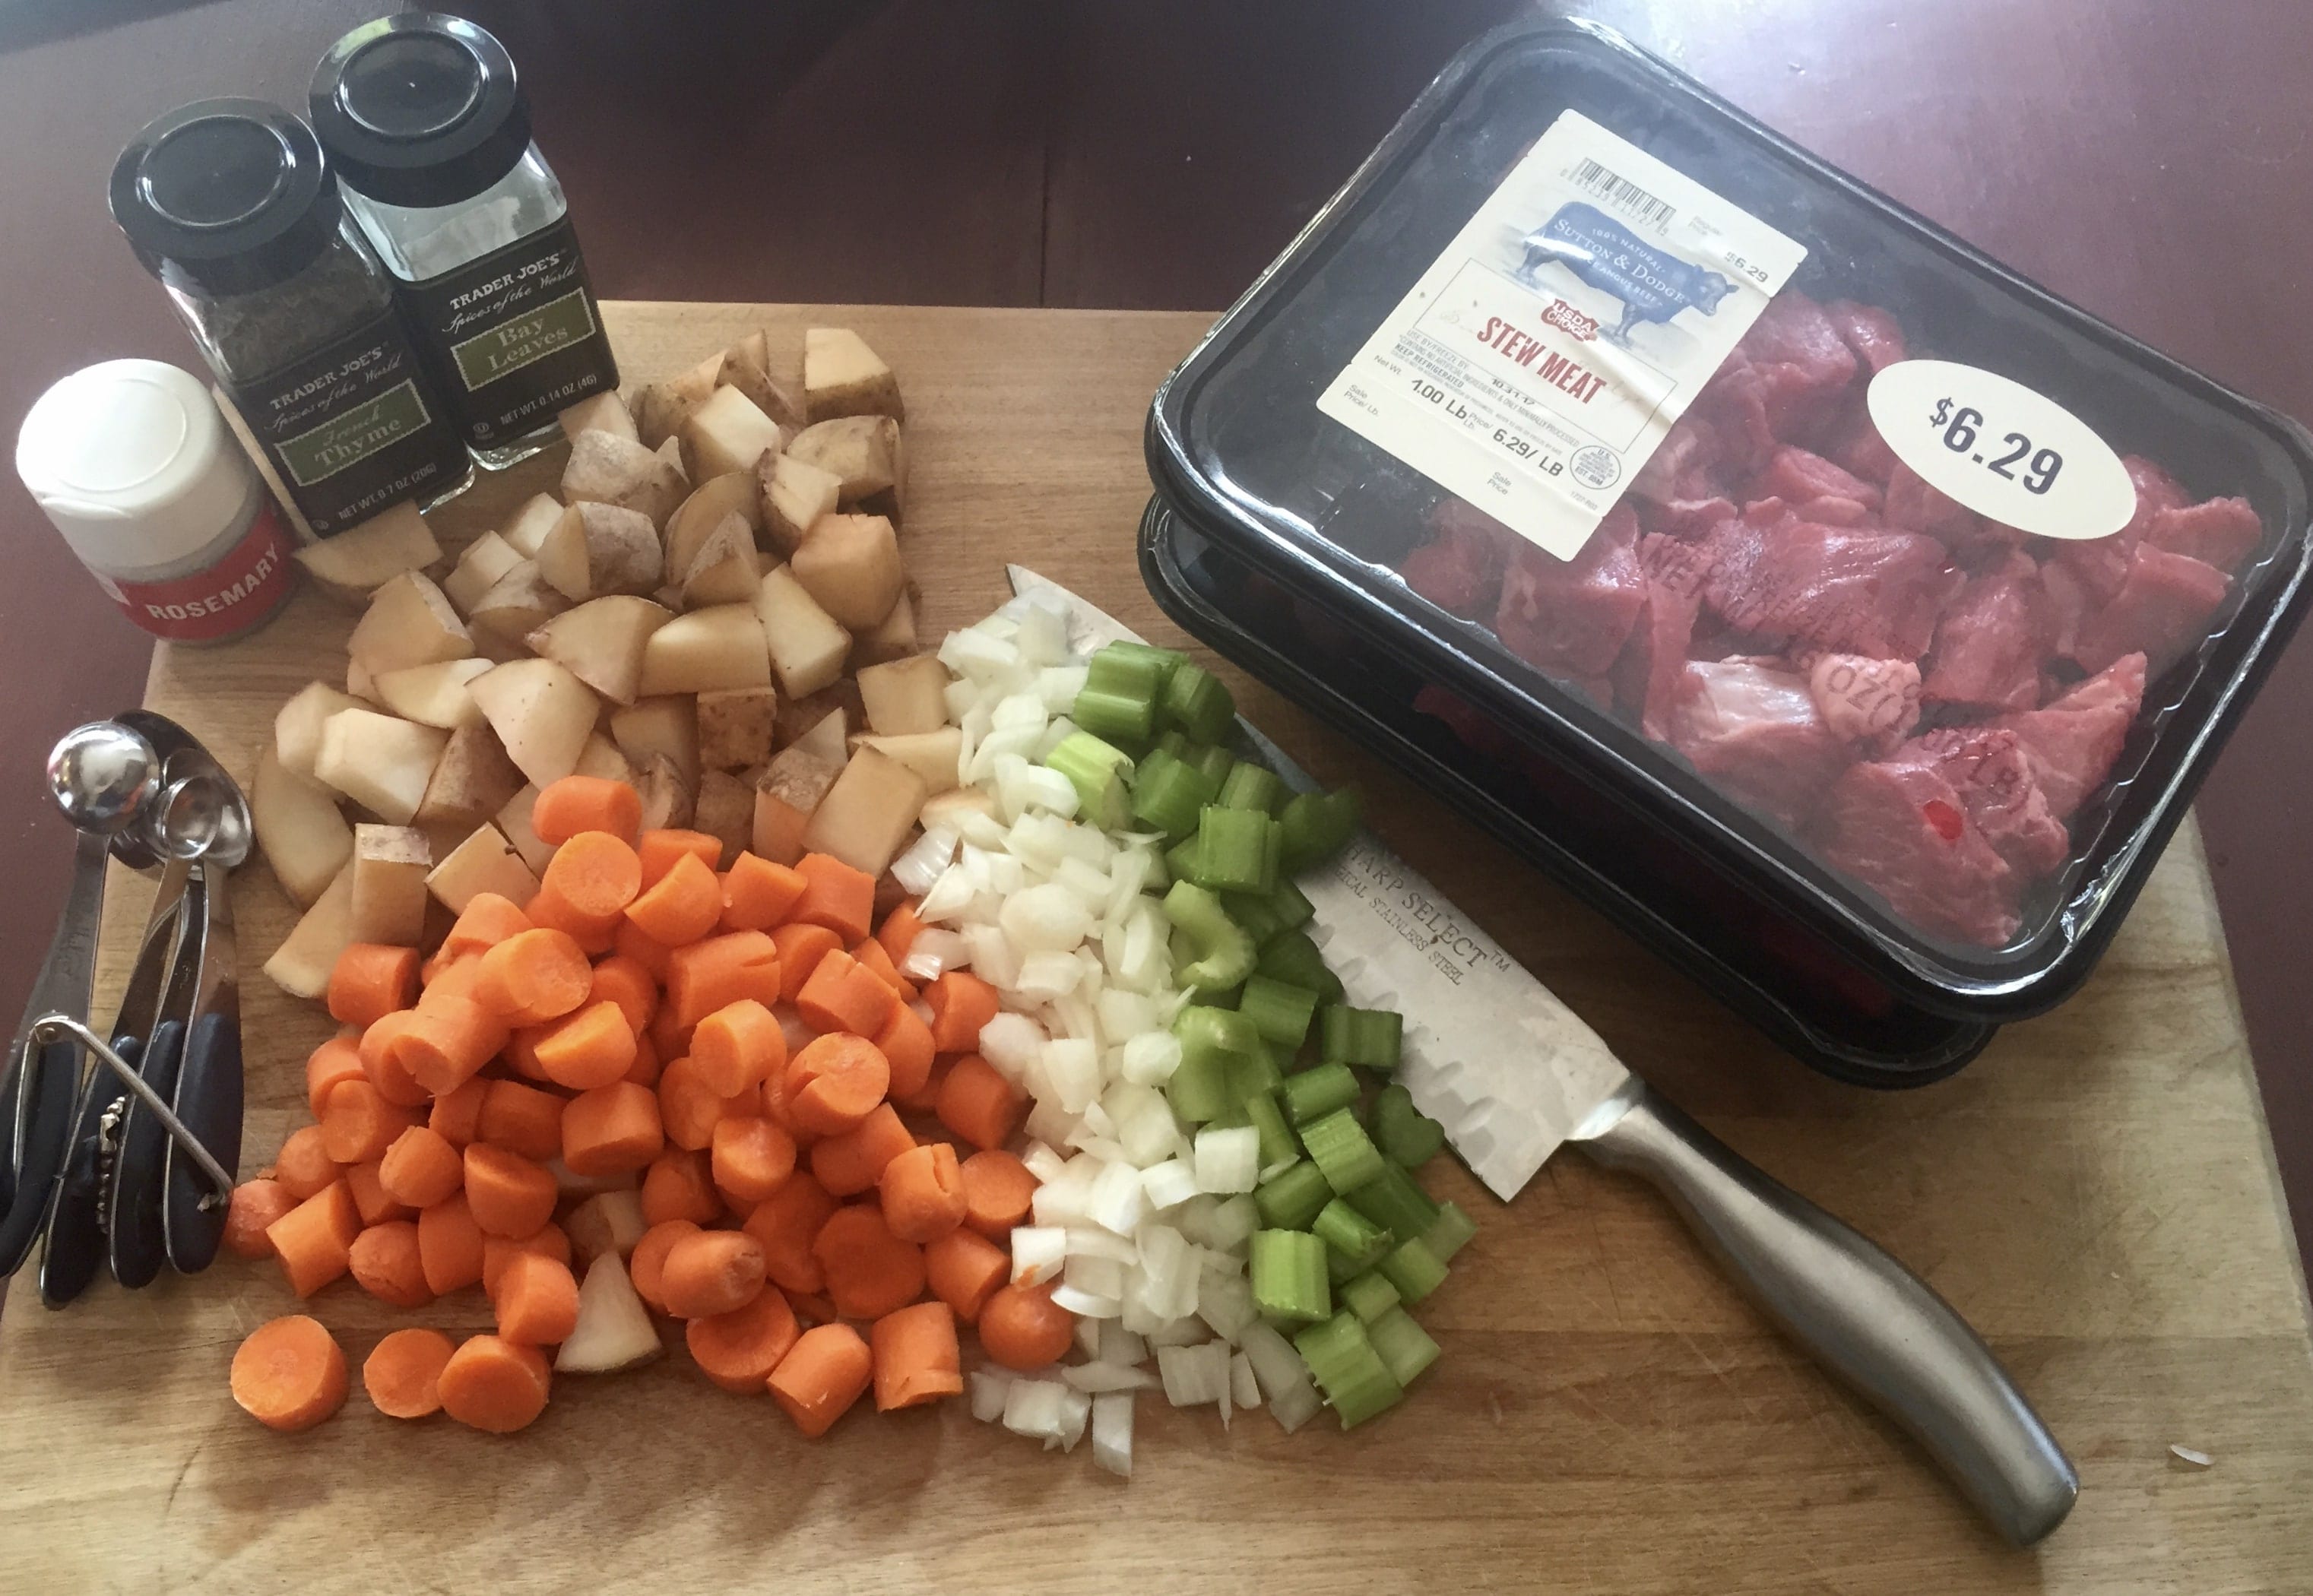
2. Add your spices: Add your chopped veggies, potatoes, and stew meat to a gallon-size freezer bag and then add in your spices.
3. Shake to mix: Remove as much air as possible from your bag, seal, and shake to mix.
4. Freeze: Lay flat in your freezer for long-term storage.
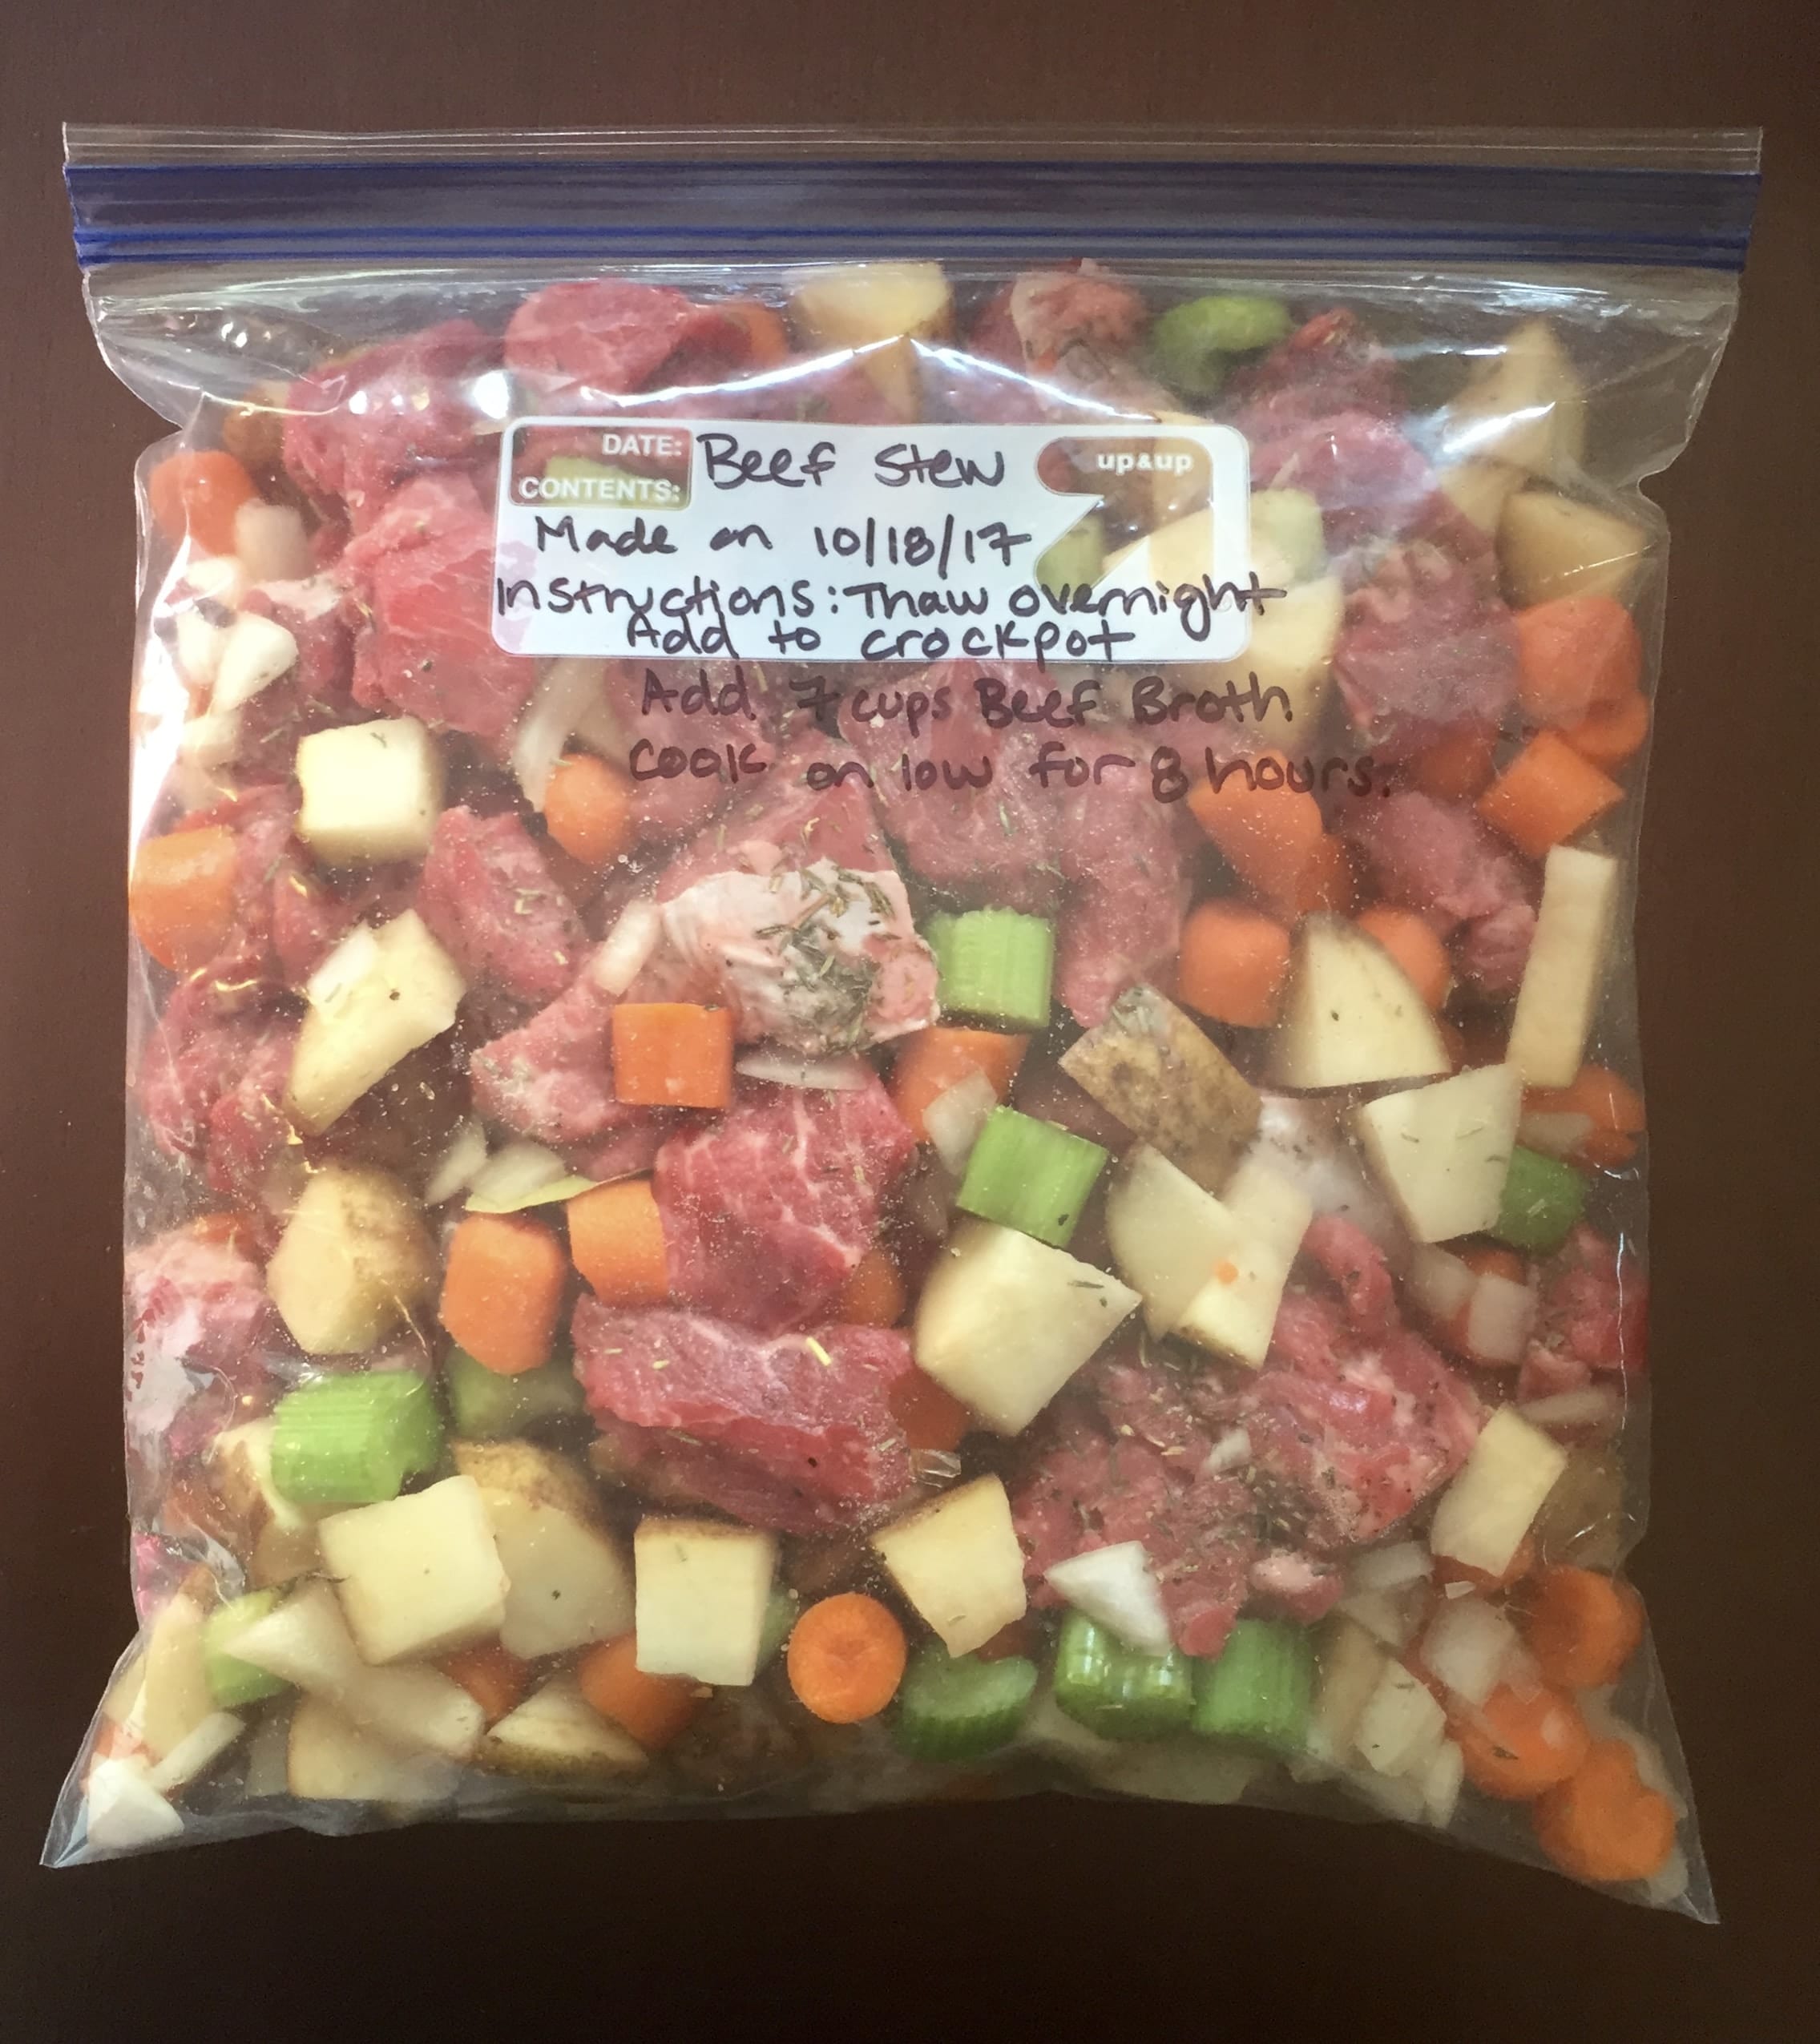
5. To eat: Move the bag from your freezer to the fridge the night before you plan on cooking it. Pour contents from the bag into a crockpot along with 7 cups of beef broth. Cook on low for 8 hours. Enjoy!
Storage: Can be stored in the freezer for up to 3 months.
Shop related products.
Reusable Silicone Food Stor...Shop on AmazonHamilton Beach (33967A) Slo...Shop on AmazonSeriously Good Freezer Meal...Shop on AmazonMommy Knows Best Lactation ...Shop on Amazon
What About You?
Did you try any of these recipes? Be sure to share some of your favorite freezer meals in the comments below and share this post with other expecting mamas.

My stew is really watery…is that normal?
If your stew turned out too watery, try cooking it for a little while with the lid off to get some of the excess liquid to evaporate. You could also try thickening it up with cornstarch or a flour paste or just by mashing up some of the potatoes.
How long would I put the stew recipe in my instant pot for?
Do you add the broth to the ingredients in the freezer bag then freeze or add at time of cooking?
Hi Donna,
You will add the broth at time of cooking.
I would like to make this recipe for my son and daughter in law for after the baby is born and I dont see the printable version, can you please send that to me – adgelle@hotmail.com. Thank you
That’s very sweet of you to make a meal for your son and daughter-in-law. That will be very helpful for them! Unfortunately, I don’t have a printable version of these recipes. I recommend either bookmarking the page, so you can come back to it later, or if you would like to have a hard copy, you are more than welcome to copy and paste into a word document so that you can print it off. Of course, I ask that you please don’t claim the recipe as your own or share it without crediting Tales of a Messy Mom.
[…] Beef Stew by Tales of a Messy Mom […]
My potatoes also turned brown. I will try an soak them first next time.
I’m so sorry to hear that your potatoes also turned brown in the freezer. I’ve updated the recipe to have the potatoes blanched before freezing.
Do you think that the stew would last longer if they were in a vacuum seal bag or will it be the same as ziploc bag?
It should definitely last longer in the freezer if you vacuum seal it. You might find this helpful: https://www.vacmasterfresh.com/fresh-bites-blog/top-15-advantages-to-vacuum-sealing-your-food/
My potatoes in the frozen beef stew were black when I thawed them. I fished them out and am hoping for the best, as the rest is in the crock pot now.
I’m so sorry your potatoes turned black Heather! I can’t imagine how frustrated you must be.
I’ve never had this issue, but I know the fresher the potatoes are, the better they freeze. Soaking the potatoes in salt water or vinegar water can also help. Russell potatoes are the most prone to turning black, if you happened to use those.
I’ll have to try the recipe with par cooking or blanching the potatoes before freezing to see how that turns out, that way other readers don’t have the same experience that you did.
I’m sorry again. I hope the rest of your stew turns out well!
If you put the potoes in the bag first and then add the beef broth before freezing the potatoes will not tuen brown. As long as they are submerged
*Update* The stew was still delicious!
Yay! So glad to hear that Heather!
they only time i have ever had potatoes turn brown is if they were cooked first the, frozen the defrosted. as you cut the palace them is water. leave them in water till ready to bag. 🙂
Thank you for the helpful input Connie. I’ve actually never bothered to cook potatoes before freezing them. Good to know!
Do the potatoes turn brown when frozen raw? Do you do any prep first?
I haven’t ever had the potatoes turn brown when frozen raw. No prep besides dicing. 🙂